

Table of Contents
An Unknown Stone, a Gemmological Workbench and One Rule: Follow the Evidence
A transparent red gemstone lies on the examination pad.
The seller calls it:
ruby.
It has attractive colour.
It is transparent.
It is well faceted.
Under ordinary room lighting, nothing immediately appears suspicious.
Now answer three questions:
Is it actually ruby?
If it is ruby, is it natural?
And if it is natural, has it been treated?
Looking at the stone is not enough.
Neither is using one electronic “gemstone tester.”
Professional gemstone identification works differently.
A gemologist collects observations progressively.
Each test answers a limited question.
Each result eliminates some possibilities.
Other possibilities remain.
The process continues until the available evidence supports a defensible conclusion—or until the stone requires testing beyond the capabilities of the standard gemmological workbench.
Today, you are the gemologist.
Welcome to the first:
NGB UNKNOWN STONE WORKSHOP
This workshop focuses on natural vs synthetic gemstone identification.
Our specimen will remain unidentified at the beginning.
We will examine it step by step.
Do not jump to the answer.
Follow the evidence.
PART I — THE MOST IMPORTANT RULE
1. Never Begin with the Seller’s Name
The parcel paper says:
That information should not become your conclusion.
For identification purposes, begin with:
Unknown transparent red faceted stone.
Why?
Because labels create expectations.
Expectations create bias.
If you expect ruby, you may unconsciously interpret ambiguous evidence as supporting ruby.
Professional identification starts with the material itself.
2. Observation Before Instrumentation
Before measuring anything, examine the stone.
Record:
Colour: red
Transparency: transparent
Cut: faceted
Lustre: vitreous to strong vitreous
Visible inclusions: none obvious to unaided eye
Already we can construct possibilities.
A transparent red stone could potentially include:
- ruby;
- red spinel;
- garnet;
- tourmaline;
- zircon;
- glass;
- synthetic corundum;
- synthetic spinel;
- another natural or artificial material.
Colour alone does not identify it.
3. Identification Is Progressive Elimination
Imagine ten possible identities.
Test 1 may eliminate four.
Test 2 eliminates another three.
Microscopy eliminates another.
Eventually only one explanation may fit all observations.
That is much more reliable than asking:
“Which gemstone does this look like?”
The professional question is:
“Which possible materials remain consistent with all the evidence?”
PART II — THE 10× LOUPE
4. First Magnification
Take a properly corrected:
10× loupe.
Examine:
- facet junctions;
- girdle;
- surface wear;
- polish;
- fractures;
- inclusions;
- possible assembly lines.
Rotate the stone.
Change illumination.
Do not merely stare through the table.
5. What Are We Looking For?
The loupe may reveal evidence such as:
- mineral inclusions;
- gas bubbles;
- growth structures;
- chips;
- abrasion;
- surface-reaching fractures;
- filled cavities;
- doublet or triplet junctions.
But absence of visible inclusions proves very little.
A clean natural gemstone can appear flawless at 10×.
A synthetic gemstone can also be extremely clean.
6. Our Unknown Stone
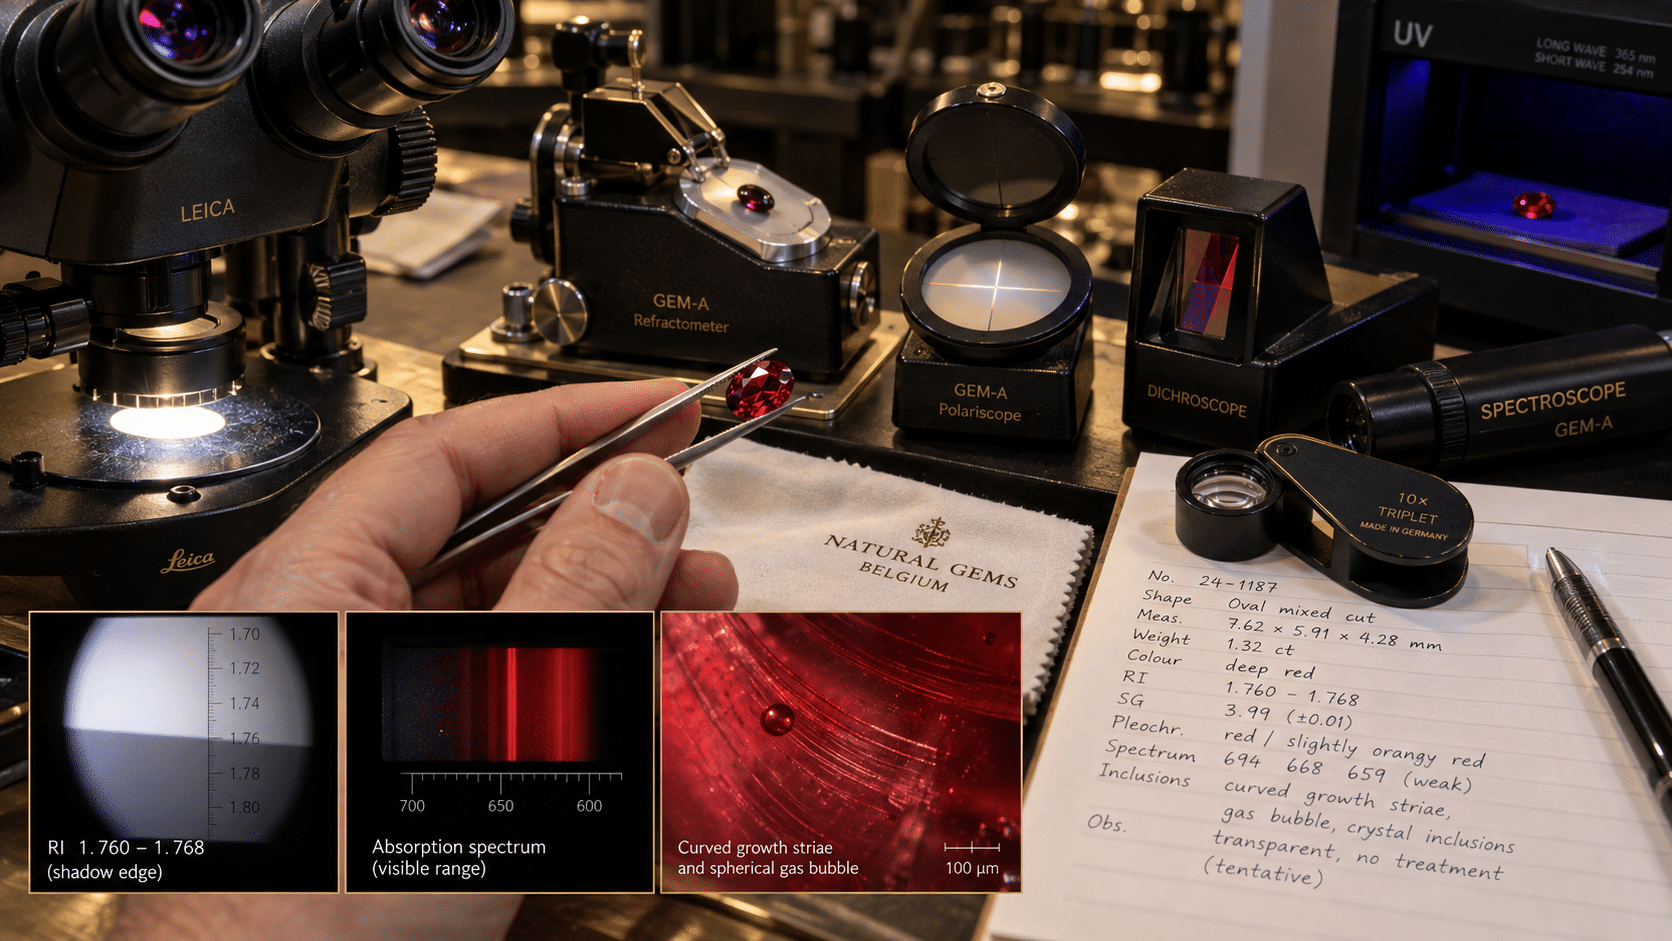
At 10× we observe:
No obvious natural mineral crystals.
No obvious fractures.
No assembly plane.
One tiny rounded feature is visible, but its nature is uncertain.
Conclusion?
Not:
synthetic.
Not:
natural.
Only:
further investigation required.
PART III — REFRACTIVE INDEX
7. Move to the Refractometer
The refractometer is one of the most useful classical gemmological instruments.
It measures:
refractive index — RI.
Refractive index describes how strongly light is slowed and refracted when entering a material.
Different gem materials occupy characteristic RI ranges.
8. Why RI Is Powerful
Suppose our unknown red stone measures approximately:
1.76–1.77.
That immediately becomes important.
It is compatible with:
corundum.
It is not compatible with many common red alternatives.
The possible-identification list becomes much shorter.
9. But RI Does Not Prove Natural Origin
This is critical.
Natural ruby is corundum.
Synthetic ruby is also corundum.
Both can therefore display essentially the refractive indices expected for corundum.
A refractometer can help answer:
What material is this?
It generally cannot by itself answer:
Did nature grow it?
10. Our Measurement
The stone is carefully positioned.
Several readings are taken while the stone is rotated.
We obtain approximately:
RI 1.762–1.770
with birefringence consistent with corundum.
Our working conclusion becomes:
Corundum strongly indicated.
Because the stone is red:
ruby is the appropriate variety hypothesis.
But we have still not established:
natural ruby
or:
synthetic ruby.
PART IV — THE POLARISCOPE
11. Optical Behaviour
Next place the stone between crossed polarizers.
The polariscope helps investigate whether a transparent gemstone behaves as:
- singly refractive;
- doubly refractive;
- anomalously doubly refractive;
- aggregate material.
Corundum is:
uniaxial and doubly refractive.
12. Rotate the Stone
As the specimen rotates between crossed polarizers, observe its light and dark behaviour.
Our stone behaves consistently with:
doubly refractive corundum.
Again, this supports the material identification.
Again, it does not yet separate:
natural corundum
from:
synthetic corundum.
This demonstrates why professional identification uses several instruments.
PART V — DICHROISM
13. The Dichroscope
Pleochroic gemstones can absorb different wavelengths differently depending on crystallographic direction.
A dichroscope allows two directional colours to be compared simultaneously.
Ruby commonly displays dichroism involving:
purplish red
and:
orangy red
components.
14. Our Unknown
The dichroscope reveals two distinct red tones consistent with ruby.
The evidence now reads:
appearance → compatible with ruby
RI → compatible with corundum
birefringence → compatible with corundum
optical behaviour → compatible with corundum
dichroism → compatible with ruby
Material identity is becoming increasingly secure.
But notice something important.
We still have not solved the natural-versus-synthetic question.
PART VI — THE SPECTROSCOPE
15. Light Absorption as Evidence
A spectroscope separates transmitted light into its component wavelengths.
Certain elements responsible for gemstone colour absorb characteristic regions of the spectrum.
Ruby owes its red colour principally to:
chromium substituting for aluminium in corundum.
Chromium produces characteristic absorption features.
16. Our Spectrum
The red stone produces a spectrum compatible with:
chromium-bearing corundum.
This strengthens the ruby identification.
But synthetic ruby can also contain chromium.
Why?
Because manufacturers deliberately introduce chromium to produce ruby colour.
Therefore:
ruby spectrum ≠ natural ruby.
This is one of the recurring lessons of today’s workshop.
Many classical tests establish:
material identity.
Natural-versus-synthetic separation often requires examination of:
growth history.
PART VII — ULTRAVIOLET FLUORESCENCE
17. UV Testing
Gemstones may fluoresce when exposed to:
- long-wave ultraviolet;
- short-wave ultraviolet
radiation.
Ruby can show red fluorescence associated with chromium.
The intensity is affected by factors including chemistry, particularly iron content.
18. Our Stone
Under ultraviolet radiation, the unknown ruby shows:
strong red fluorescence.
Interesting.
But is that proof of synthetic origin?
No.
Natural ruby can fluoresce strongly.
Synthetic ruby can fluoresce strongly.
Fluorescence therefore becomes:
supporting evidence
rather than a verdict.
PART VIII — STOP AND REVIEW
At this stage our observation sheet reads:
Colour: Red
Transparency: Transparent
RI: approximately 1.762–1.770
Birefringence: compatible with corundum
Optical character: compatible with uniaxial corundum
Pleochroism: compatible with ruby
Visible spectrum: chromium-bearing corundum pattern
UV: strong red fluorescence
What can we reasonably conclude?
The stone is ruby/corundum.
What can we not yet conclude?
Whether it is natural or synthetic.
Now the investigation becomes more interesting.
PART IX — THE GEMMOLOGICAL MICROSCOPE
19. Growth History Becomes Visible
The microscope is among the most powerful tools for separating many natural and synthetic gemstones.
Why?
Because crystal growth can leave:
physical records inside the gemstone.
Natural geological growth may preserve:
- mineral inclusions;
- fluid inclusions;
- healed fissures;
- exsolution products;
- natural growth zoning.
Synthetic growth may preserve:
- curved growth structures;
- gas bubbles;
- flux residues;
- seed plates;
- metallic inclusions;
- characteristic synthetic growth boundaries.
But the exact evidence depends on the synthesis method.
20. Begin with Darkfield Illumination
Place the ruby under the microscope.
Begin at relatively low magnification.
Do not immediately zoom into one inclusion.
Survey the entire stone.
Rotate it.
Tilt it.
Change focus.
Change illumination.
Some structures appear only from specific directions.
21. The Rounded Feature Returns
Remember the tiny rounded feature seen with the loupe?
Under higher magnification it becomes clearly visible.
It is:
a spherical bubble.
Interesting.
Gas bubbles are well known in some synthetic growth environments, especially flame-fusion products.
But one bubble alone should still be interpreted carefully.
We continue.
PART X — THE CRITICAL OBSERVATION
22. Rotate the Stone Again
With the stone tilted and the illumination adjusted, faint lines appear.
At first they are difficult to see.
Then their geometry becomes clear.
They are not straight.
They are:
curved.
Multiple parallel curved growth lines pass through the stone.
Now our evidence has changed dramatically.
23. Curved Growth Striae
Curved growth striae are a classic feature of:
Verneuil flame-fusion synthetic corundum.
The geometry results from the way the synthetic boule develops during flame-fusion growth.
Natural corundum growth zoning is normally related to crystallographic growth surfaces and tends to produce angular rather than smoothly curved growth structures.
The combination:
curved growth striae + spherical gas bubbles
is therefore extremely significant.
24. Return to Yesterday’s Article
Yesterday we examined the Verneuil process.
Powdered material passes through a high-temperature flame.
Molten droplets accumulate.
A boule gradually grows.
Today we are observing the microscopic evidence left by that process.
This is the bridge between:
crystal-growth theory
and:
gemstone identification.
PART XI — THE WORKING CONCLUSION
Our complete evidence now reads:
RI: corundum
Optical behaviour: corundum
Dichroism: ruby
Spectrum: chromium-bearing corundum
Fluorescence: compatible with ruby
Microscopy: spherical gas bubbles
Microscopy: curved growth striae
The evidence converges.
Our identification is:
FLAME-FUSION SYNTHETIC RUBY
Not:
red glass.
Not:
ruby imitation.
Not:
natural ruby.
It is genuine corundum material grown artificially.
Therefore the precise description is:
synthetic ruby.
PART XII — WHY THE FIRST TESTS STILL MATTERED
25. Couldn’t We Have Used the Microscope Immediately?
Perhaps.
An experienced gemologist might recognise classic curved striae quickly.
But consider what happens if the microscopic feature is:
- faint;
- partially obscured;
- unusual;
- misinterpreted.
The supporting measurements establish that the material itself behaves like corundum.
Identification becomes stronger because:
independent evidence agrees.
26. Evidence Convergence
Professional gemmology rarely asks:
“What single test gives me the answer?”
A better question is:
“Do independent observations converge on the same explanation?”
For our ruby:
physical properties
optical properties
spectroscopy
microscopy
all fit one interpretation.
That is much stronger than a visual guess.
PART XIII — CHANGE THE UNKNOWN STONE
Now imagine a second transparent red gemstone.
Its appearance is remarkably similar.
We repeat the workflow.
27. Unknown Stone B
The refractometer again indicates:
corundum.
The polariscope is consistent.
The dichroscope is consistent.
The spectrum indicates chromium-bearing corundum.
Again:
ruby.
Now we use the microscope.
28. But There Are No Curved Striae
Instead we observe:
- angular growth zoning;
- small mineral crystals;
- rutile-related features;
- healed fissures.
This inclusion assemblage is compatible with:
natural geological growth.
Our conclusion may now become:
natural ruby.
Notice that the classical measurements of Stones A and B could be extremely similar.
Both are corundum.
Their decisive difference lies in:
growth history.
PART XIV — NATURAL DOES NOT FINISH THE INVESTIGATION
29. A New Question Appears
Once natural origin is established, another question remains:
Has the ruby been treated?
Microscopy may reveal evidence of heating such as:
- altered mineral inclusions;
- modified rutile;
- tension fractures around inclusions;
- partially healed fissures;
- flux residues under certain heating conditions.
Treatment identification is therefore another investigation.
30. Identity, Origin and Treatment
The correct sequence is:
What is it?
Ruby.
Natural or synthetic?
Natural.
Treated or untreated?
Requires treatment investigation.
These conclusions should never be collapsed into one.
PART XV — UNKNOWN STONE C: RED GLASS
Now a third red faceted stone arrives.
It looks surprisingly convincing.
31. Loupe Observation
Magnification reveals:
- several rounded bubbles;
- faint flow-like structures.
Does that automatically mean synthetic ruby?
No.
Gas bubbles can occur in:
glass.
We must measure the material.
32. Refractive Index Changes Everything
The RI is around the range expected for certain glasses rather than corundum.
The polariscope shows:
isotropic behaviour, apart from possible strain effects.
No ruby-like dichroism is observed.
The evidence now contradicts corundum.
The material is identified as:
glass.
If it is represented as ruby, it is:
a ruby imitation.
33. Same Bubble, Different Interpretation
This is an essential workshop lesson.
Stone A contained gas bubbles.
Stone C contains gas bubbles.
Yet:
Stone A = synthetic ruby
and:
Stone C = glass imitation.
Why?
Because an inclusion is interpreted in the context of:
all available properties.
One visual clue does not identify a gemstone.
PART XVI — UNKNOWN STONE D: SYNTHETIC EMERALD
Now replace the red stone with a transparent green gemstone.
The seller calls it:
emerald.
34. Standard Testing
Refractive-index measurements and optical behaviour indicate:
beryl.
The colour is appropriate for emerald.
Material identity is therefore compatible with:
emerald.
But once again:
natural or synthetic?
35. Why Emerald Can Be Difficult
Synthetic emerald can be grown principally by:
- flux methods;
- hydrothermal methods.
These processes differ fundamentally from flame fusion.
Therefore we should not expect every synthetic emerald to show:
curved Verneuil striae.
Different synthesis methods create different evidence.
PART XVII — FLUX-GROWN SYNTHETIC EMERALD
36. Flux Residues
Flux-grown synthetic emerald may contain:
- veil-like flux inclusions;
- residual flux;
- seed-related features;
- characteristic growth structures.
Some can superficially resemble natural healed fissures.
This is why inclusion recognition requires experience.
37. Natural-Looking Does Not Mean Natural
Synthetic gemstone technology has existed for more than a century.
Some products are sophisticated.
The simplistic rule:
“bubbles mean synthetic; crystals mean natural”
is unreliable.
Synthetic stones can contain:
- crystals;
- flux residues;
- complex growth features.
Natural stones can contain:
- fluid cavities;
- rounded-looking inclusions;
- complicated healed fractures.
Interpretation requires context.
PART XVIII — HYDROTHERMAL SYNTHETIC EMERALD
38. Reproducing Fluid Growth
Hydrothermal synthesis uses hot aqueous solutions under elevated pressure.
This resembles aspects of natural hydrothermal mineral growth.
Consequently, hydrothermal synthetic emerald can contain internal features that appear much more geologically plausible than simple flame-fusion features.
Published studies describe features including:
- characteristic growth and colour zoning;
- seed-related structures;
- needle-like tubes;
- cone-shaped voids or nailhead-spicule-type features in certain products.
39. Advanced Spectroscopy
When microscopy does not resolve the problem confidently, advanced laboratory methods can help.
Research using:
Raman spectroscopy
and:
FTIR spectroscopy
has shown that water-related features in emerald can help separate many natural, hydrothermal synthetic and flux-grown synthetic populations.
This is an excellent example of the boundary between:
classical gemmology
and:
advanced laboratory gemmology.
PART XIX — WHEN TO STOP
40. One of the Most Professional Skills
Suppose you have an emerald whose:
- RI fits emerald;
- optical properties fit emerald;
- colour fits emerald;
- inclusions are ambiguous.
You suspect synthetic origin.
But you cannot prove it.
What should you do?
Not:
guess.
The correct conclusion is:
further laboratory analysis required.
Knowing when the evidence has exceeded your instruments is part of professional gemmology.
PART XX — THE ESCALATION RULE
A useful hierarchy is:
VISUAL OBSERVATION
↓
10× MAGNIFICATION
↓
REFRACTIVE INDEX
↓
OPTICAL CHARACTER
↓
PLEOCHROISM
↓
VISIBLE SPECTRUM
↓
UV RESPONSE
↓
MICROSCOPY
↓
if unresolved:
ADVANCED LABORATORY ANALYSIS
Possible advanced methods include:
- Raman spectroscopy;
- FTIR;
- UV-Vis-NIR spectroscopy;
- photoluminescence;
- XRF;
- LA-ICP-MS;
- specialised imaging.
Not every stone requires every technique.
The objective is:
sufficient evidence for the question being asked.
PART XXI — WHY TEST ORDER MATTERS
41. Start Non-Destructively
Gemstones can be valuable.
Testing should therefore begin with methods that preserve the specimen.
Most standard gemmological testing is:
non-destructive.
The gemologist collects the maximum useful information with minimal intervention.
42. Efficient Testing
If refractive index immediately rules out ruby, there may be no reason to spend twenty minutes searching for ruby inclusions.
If microscopy immediately reveals an obvious assembled-stone junction, the testing strategy changes.
Professional testing is therefore:
structured but adaptive.
PART XXII — THE REFRACTOMETER’S LIMIT
43. Excellent for Identity, Limited for Growth Origin
The refractometer can distinguish many gem species because their refractive indices differ.
But natural and synthetic versions of the same crystalline material can have very similar RIs.
Therefore:
RI can identify corundum
without determining:
natural versus synthetic corundum.
The same principle applies to other synthetic counterparts.
PART XXIII — THE POLARISCOPE’S LIMIT
44. Optical Structure, Not a Naturalness Detector
The polariscope can provide important information about:
- isotropic behaviour;
- anisotropic behaviour;
- aggregate reactions;
- optic character.
But a synthetic crystal can possess the same fundamental crystal structure as its natural counterpart.
Therefore the polariscope is not:
a synthetic gemstone detector.
It is one piece of the identification system.
PART XXIV — THE SPECTROSCOPE’S LIMIT
45. Colour Chemistry Can Be Reproduced
Natural ruby contains chromium.
Synthetic ruby can be grown with chromium.
Natural emerald may contain chromium and/or vanadium.
Synthetic emerald can be grown with suitable colouring elements.
Consequently, similar chromophores can create similar absorption features.
A spectrum must therefore be interpreted in context.
PART XXV — THE MICROSCOPE’S STRENGTH
46. Seeing History
Why is microscopy so powerful?
Because inclusions and growth structures can preserve evidence of:
how a crystal grew.
A refractive index describes a physical property.
An inclusion can record an event.
A growth zone can record crystal development.
A partially dissolved inclusion can record heating.
Flux can record synthetic growth or treatment.
The microscope therefore gives access to:
history.
PART XXVI — THE MICROSCOPE’S LIMIT
47. Not Every Stone Cooperates
Some gemstones are:
extremely clean.
Some diagnostic features are:
poorly oriented.
Some are:
too small.
Some stones have been treated in ways that modify internal evidence.
Some synthetic products closely imitate natural growth features.
Therefore even expert microscopy sometimes cannot provide the final answer.
PART XXVII — ELECTRONIC “GEM TESTERS”
48. The Dangerous Expectation
Consumer devices are often marketed in ways that encourage the idea:
touch stone → machine identifies gemstone.
Some instruments are genuinely useful screening tools.
But no simple handheld tester replaces a complete gemmological investigation across all gemstones.
49. Diamond Tester Example
A thermal conductivity tester can help distinguish diamond from many simulants.
But laboratory-grown diamond is:
diamond.
Its fundamental thermal behaviour is therefore diamond-like.
A basic thermal tester cannot establish:
natural versus laboratory-grown diamond.
Additional screening technology is required.
PART XXVIII — BUILD AN OBSERVATION SHEET
For every unknown gemstone, record observations before drawing conclusions.
BASIC OBSERVATION
Colour:
Transparency:
Cut:
Weight:
Dimensions:
Lustre:
Visible features:
OPTICAL TESTING
Birefringence:
Optical character:
Pleochroism:
Spectrum:
UV reaction:
MICROSCOPY
Mineral inclusions:
Fluid inclusions:
Growth structures:
Fractures:
Treatment evidence:
Synthetic-growth evidence:
Composite evidence:
CONCLUSION
Material identity:
Natural / synthetic:
Treatment:
Confidence:
Advanced testing required:
This prevents memory and expectation from replacing evidence.
PART XXIX — THE EVIDENCE TABLE
| Observation | What It Can Help Establish | What It Usually Cannot Establish Alone |
|---|---|---|
| Colour | Initial possibilities | Identity |
| Loupe | Inclusions, wear, assembly clues | Complete identification |
| RI | Material/species possibilities | Natural vs synthetic counterpart |
| Polariscope | Optical behaviour | Natural origin |
| Dichroscope | Pleochroism | Complete identity |
| Spectroscope | Absorption/chromophore evidence | Natural origin in many cases |
| UV | Fluorescence behaviour | Complete identification |
| Microscope | Growth, inclusions, treatment clues | Every modern synthetic/treatment |
| Advanced spectroscopy | Structure, defects, treatment/growth evidence | Every question with one measurement |
| Trace chemistry | Chemical fingerprint | Complete interpretation without reference data |
The central lesson is obvious:
every instrument has limits.
PART XXX — WORKSHOP CHALLENGE 1
An unknown red stone gives:
RI: approximately 1.76–1.77
DR: yes
Pleochroism: red/orangy-red components
Spectrum: chromium-related ruby spectrum
Microscopy: curved striae + spherical gas bubbles
Your conclusion?
Flame-fusion synthetic ruby.
PART XXXI — WORKSHOP CHALLENGE 2
Another red stone gives:
RI: corundum range
DR: yes
Spectrum: ruby
Microscopy: angular growth zoning + natural mineral inclusions + rutile-related features
Your conclusion?
Evidence supports:
natural ruby.
But another question remains:
treatment status?
Further examination is required.
PART XXXII — WORKSHOP CHALLENGE 3
Another red stone gives:
RI: substantially below corundum
Optical behaviour: isotropic
Pleochroism: absent
Microscopy: numerous spherical bubbles and flow structures
Conclusion?
Glass.
If sold as ruby:
ruby imitation.
PART XXXIII — WORKSHOP CHALLENGE 4
A green stone gives:
properties: compatible with emerald/beryl
microscopy: ambiguous unusual growth structures
natural versus synthetic: unresolved
What should the gemologist write?
Not:
natural emerald because I cannot prove synthetic.
Not:
synthetic emerald because it looks suspicious.
The professional answer is:
additional laboratory analysis required.
PART XXXIV — NEGATIVE EVIDENCE
50. “I Didn’t See Anything Synthetic”
This is not equivalent to:
natural.
Absence of a diagnostic synthetic feature may simply mean:
- it is not visible;
- orientation is unfavourable;
- the stone is too clean;
- a different synthetic method was used;
- your magnification or illumination is insufficient.
Identification must be based on positive evidence, not wishful absence.
PART XXXV — THE SAME RULE APPLIES TO TREATMENT
51. “I Didn’t See Heat”
This does not always justify:
unheated.
Treatment determination can require:
- specialised microscopy;
- spectroscopy;
- chemical analysis;
- laboratory expertise.
The required evidence depends on:
gemstone + treatment + commercial importance.
PART XXXVI — WHY REFERENCE COLLECTIONS MATTER
52. Instruments Are Only Part of the Laboratory
A microscope without experience is simply:
magnification.
A spectrum without reference knowledge is simply:
lines and bands.
A chemical measurement without comparison is simply:
numbers.
Professional identification depends on:
instrumentation + reference data + experience + interpretation.
PART XXXVII — BUILDING GEMMOLOGICAL MEMORY
53. Study Known Stones
One of the best ways to learn gemstone identification is to examine specimens whose identities are already established.
Compare:
natural ruby vs flame-fusion ruby
natural emerald vs flux synthetic emerald
natural emerald vs hydrothermal synthetic emerald
diamond vs cubic zirconia
diamond vs synthetic moissanite
solid opal vs opal doublet
Repeated observation creates:
pattern recognition.
But pattern recognition must remain anchored to measurable evidence.
PART XXXVIII — NEVER FORCE THE ANSWER
54. The Most Dangerous Gemstone Is the One You “Almost Know”
A completely unfamiliar gemstone makes us cautious.
A gemstone that looks familiar can make us careless.
The phrase:
“It probably is…”
should trigger another test.
Professional identification is not about being fast enough to impress someone.
It is about being:
correct enough to defend the conclusion.
PART XXXIX — THREE LEVELS OF CONCLUSION
A useful professional framework is:
LEVEL 1 — IDENTIFIED
Evidence is sufficient.
Example:
flame-fusion synthetic ruby.
LEVEL 2 — PROVISIONAL
Evidence strongly suggests an identity, but important uncertainty remains.
Example:
properties consistent with emerald; natural/synthetic origin unresolved.
LEVEL 3 — ESCALATE
The commercial or scientific question requires advanced laboratory analysis.
Example:
natural versus sophisticated hydrothermal synthetic emerald cannot be confidently resolved using available equipment.
Knowing which level applies is part of gemmological competence.
PART XL — THE COMPLETE NGB IDENTIFICATION WORKFLOW
When an unknown gemstone arrives, think:
DO NOT TRUST THE LABEL
↓
OBSERVE
Colour, transparency, lustre, cut, visible features
↓
MAGNIFY
Loupe
↓
MEASURE
Refractive index and other appropriate physical properties
↓
DETERMINE OPTICAL BEHAVIOUR
Polariscope
↓
OBSERVE PLEOCHROISM
Dichroscope where appropriate
↓
EXAMINE ABSORPTION
Spectroscope
↓
CHECK LUMINESCENCE
UV where relevant
↓
INVESTIGATE INTERNAL HISTORY
Microscope
↓
ask:
DOES ALL EVIDENCE AGREE?
If yes:
IDENTIFY
If no:
INVESTIGATE THE CONTRADICTION
If unresolved:
ESCALATE TO ADVANCED LABORATORY TESTING
That is a professional workflow.
PART XLI — THE CENTRAL PRINCIPLE
The first unknown stone looked like ruby.
Eventually we established:
synthetic ruby.
But notice how we reached that conclusion.
Not because:
it looked synthetic.
Not because:
it fluoresced.
Not because:
a tester beeped.
Not because:
one bubble existed.
The conclusion emerged because multiple observations formed a coherent explanation.
The refractometer established:
corundum.
The dichroscope and spectrum supported:
ruby.
The microscope revealed:
curved growth striae and gas bubbles.
The growth evidence matched:
flame-fusion synthesis.
Therefore:
flame-fusion synthetic ruby.
This is evidence convergence.
PART XLII — THE PROFESSIONAL HABIT
Every time you examine a gemstone, separate three things:
OBSERVATION
What did I actually see or measure?
INTERPRETATION
What could that observation mean?
CONCLUSION
What explanation best fits all evidence?
Never turn interpretation into observation.
For example:
Bad note:
“Synthetic lines visible.”
Better note:
“Multiple parallel curved growth striae visible under magnification.”
Then interpretation:
Characteristic of flame-fusion growth in corundum.
Then conclusion:
Supports synthetic origin.
This discipline reduces confirmation bias.
Conclusion
The most important instrument in gemstone identification is not the refractometer.
It is not the microscope.
It is not the spectroscope.
It is:
a disciplined testing process.
Each gemmological instrument answers a different question.
The refractometer measures optical properties that can strongly narrow material identity.
The polariscope investigates optical behaviour.
The dichroscope reveals pleochroism.
The spectroscope reveals selective absorption.
Ultraviolet testing examines fluorescence behaviour.
The microscope investigates inclusions, growth structures and treatment evidence.
Advanced laboratory techniques can resolve questions that classical instruments cannot.
But no instrument should be treated as a universal:
“real gemstone detector.”
That concept does not reflect professional gemmology.
Instead, identification is a process of:
observation
↓
measurement
↓
elimination
↓
comparison
↓
evidence convergence
↓
conclusion.
Our first unknown stone demonstrates the principle perfectly.
At first it was merely:
a transparent red gemstone.
Refractive index moved us toward:
corundum.
Optical behaviour strengthened that identification.
Dichroism and spectroscopy supported:
ruby.
But none of those observations established natural origin.
Only when microscopy revealed:
curved growth striae
together with:
spherical gas bubbles
did the growth history become clear.
The stone was:
flame-fusion synthetic ruby.
Our second ruby demonstrated the opposite situation.
Natural mineral inclusions and geological growth structures supported:
natural origin.
But even then the investigation was not complete.
A new question appeared:
Has it been treated?
Our glass imitation demonstrated why a gas bubble alone means little.
Our synthetic emerald problem demonstrated why some questions exceed the classical gemmological workbench.
And that leads to perhaps the most professional sentence a gemologist can learn:
“The available evidence is insufficient; further laboratory testing is required.”
That is not failure.
It is evidence discipline.
A professional gemologist should never be embarrassed by uncertainty when the evidence genuinely remains uncertain.
The dangerous conclusion is not:
“I do not yet know.”
The dangerous conclusion is:
“I think I know, so I will stop testing.”
Gemstones reward curiosity.
They punish assumptions.
And the best identification workflow therefore begins with an unknown stone and one simple rule:
Follow the evidence.
References & Further Reading
Gemological Institute of America (GIA) — Gem Identification Lab.
GIA’s practical gem-identification programme confirms the complementary use of microscope, refractometer, polariscope, dichroscope, spectroscope and loupe for identifying natural and laboratory-grown gemstones, imitations and assembled stones. It is an excellent reference for understanding why professional identification is a multi-instrument procedure rather than a single-test process.
https://www.gia.edu/cn/gem-education/gem-identification
Gemological Institute of America (GIA) — Gem Identification: Introduction and Progressive Testing Method.
GIA describes a reliable progressive testing methodology in which standard gemmological instruments are used together to eliminate alternatives until a defensible identification is reached.
https://elearning-samples.gia.edu/Gem_Identification/Page9.html
Gemological Institute of America (GIA) — Gem Identification Equipment.
Useful practical reference listing the standard equipment used in classical gem identification, including a corrected 10× loupe, refractometer, polariscope, optic figure sphere, dichroscope and spectroscope, with microscope and UV equipment also recommended.
https://elearning-samples.gia.edu/Gem_Identification/Page12.html
Gem-A — Gemmology Laboratory Classes.
Gem-A’s professional practical training likewise combines refractometry, spectroscopy, polariscopy, conoscopic examination, dichroscopy, colour filters, UV testing and hydrostatic specific-gravity determination, reinforcing the principle that gemstone identification relies on complementary evidence.
https://gem-a.com/education/lab-classes/
GIA — Spring 1991 Gems & Gemology, Laboratory Notes: Flame-Fusion Synthetic Ruby.
A useful classical example in which refractive indices, strong UV fluorescence, absorption spectrum, curved striae and spherical gas bubbles were combined to identify flame-fusion synthetic ruby. This provides direct technical support for the first unknown-stone exercise in this workshop.
https://www.gia.edu/doc/SP91.pdf
Hughes, E. B. — Curved Banding in Flame-Fusion Synthetic Sapphires. Gems & Gemology, Summer 2019.
Illustrates curved growth banding associated with Verneuil-grown synthetic corundum and demonstrates why growth geometry can provide important evidence of synthetic origin.
https://www.gia.edu/gems-gemology/summer-2019-microworld-curved-banding-flame-fusion-synthetic-sapphires
Schmetzer, K., Kiefert, L., Bernhardt, H.-J. & Zhang Beili — Characterization of Chinese Hydrothermal Synthetic Emerald. Gems & Gemology, Winter 1997.
Detailed investigation of hydrothermal synthetic emerald, including growth and colour zoning, oriented needle-like tubes, cone-shaped voids and spectroscopic characteristics. Particularly useful for demonstrating why different synthetic growth methods create different diagnostic features.
https://www.gia.edu/gems-gemology/winter-1997-chinese-hydrothermal-synthetic-emerald-schmetzer
Huong, L. T.-T., Häger, T. & Hofmeister, W. — Confocal Micro-Raman Spectroscopy: A Powerful Tool to Identify Natural and Synthetic Emeralds. Gems & Gemology, Spring 2010.
Study of more than 300 natural and synthetic emeralds showing how Raman spectroscopy of water-related features can help distinguish natural from synthetic emerald and can also provide information about synthesis technique.
https://origin.prod.gia.edu/gems-gemology/spring-2010-emeralds-spectroscopy-huong
Huong, L. T.-T., Hofmeister, W., Häger, T., Karampelas, S. & Kien, N. D.-T. — A Preliminary Study on the Separation of Natural and Synthetic Emeralds Using Vibrational Spectroscopy. Gems & Gemology, Winter 2014.
Technical Raman and FTIR study explaining how structural water and alkali-related spectral features can help distinguish natural, hydrothermal synthetic and flux-grown synthetic emeralds while also documenting important limitations and overlaps.
https://www.gia.edu/gems-gemology/winter-2014-emeralds-vibrational-spectroscopy
Gem-A — Artificial Glass Paste in Antique Jewellery.
Useful practical example of combining optical behaviour, absence of pleochroism, refractive-index measurements and microscopic observations to recognise glass imitations rather than relying solely on visual resemblance.
https://gem-a.com/gem-hub/gem-knowledge-what-is-artificial-glass-paste-in-antique-jewellery/
GIA — Using Conventional Equipment to Separate Natural from Synthetic Ametrine. Gems & Gemology, Summer 2014.
A valuable example demonstrating that carefully interpreted classical instrumentation—including refractometer and polariscope/conoscope observations—can sometimes contribute substantially to natural-versus-synthetic separation without immediately resorting to advanced analytical instrumentation.
https://www.gia.edu/gems-gemology/summer-2014-abstracts-separate-natural-from-synthetic-ametrine0
[…] A natural gemstone may have spent millions of years beneath the Earth’s surface before being discovered, cut, polished or placed in a collection. […]