
A Practical Guide to Seeing What Different Light Reveals Inside a Gemstone
A microscope does not simply make a gemstone larger.
Used properly, it changes how the gemstone is illuminated.
That difference is fundamental.
A crystal inclusion that appears almost invisible in transmitted light may suddenly glow against a black background in darkfield.
A colour zone hidden by reflections may become obvious under diffused brightfield illumination.
A fracture may flash brightly when struck by a fibre-optic light from exactly the right angle.
Surface polish, coatings and cavities may become much easier to study under reflected light.
Crossed polarizers can reveal strain or optically oriented internal structures invisible under ordinary illumination.
The microscope therefore gives the gemmologist two major advantages over a handheld loupe:
greater magnification
and
Of the two, controlled lighting is often the more important.
Professional laboratories do not use one universal microscope-light setting because different features interact with light differently.
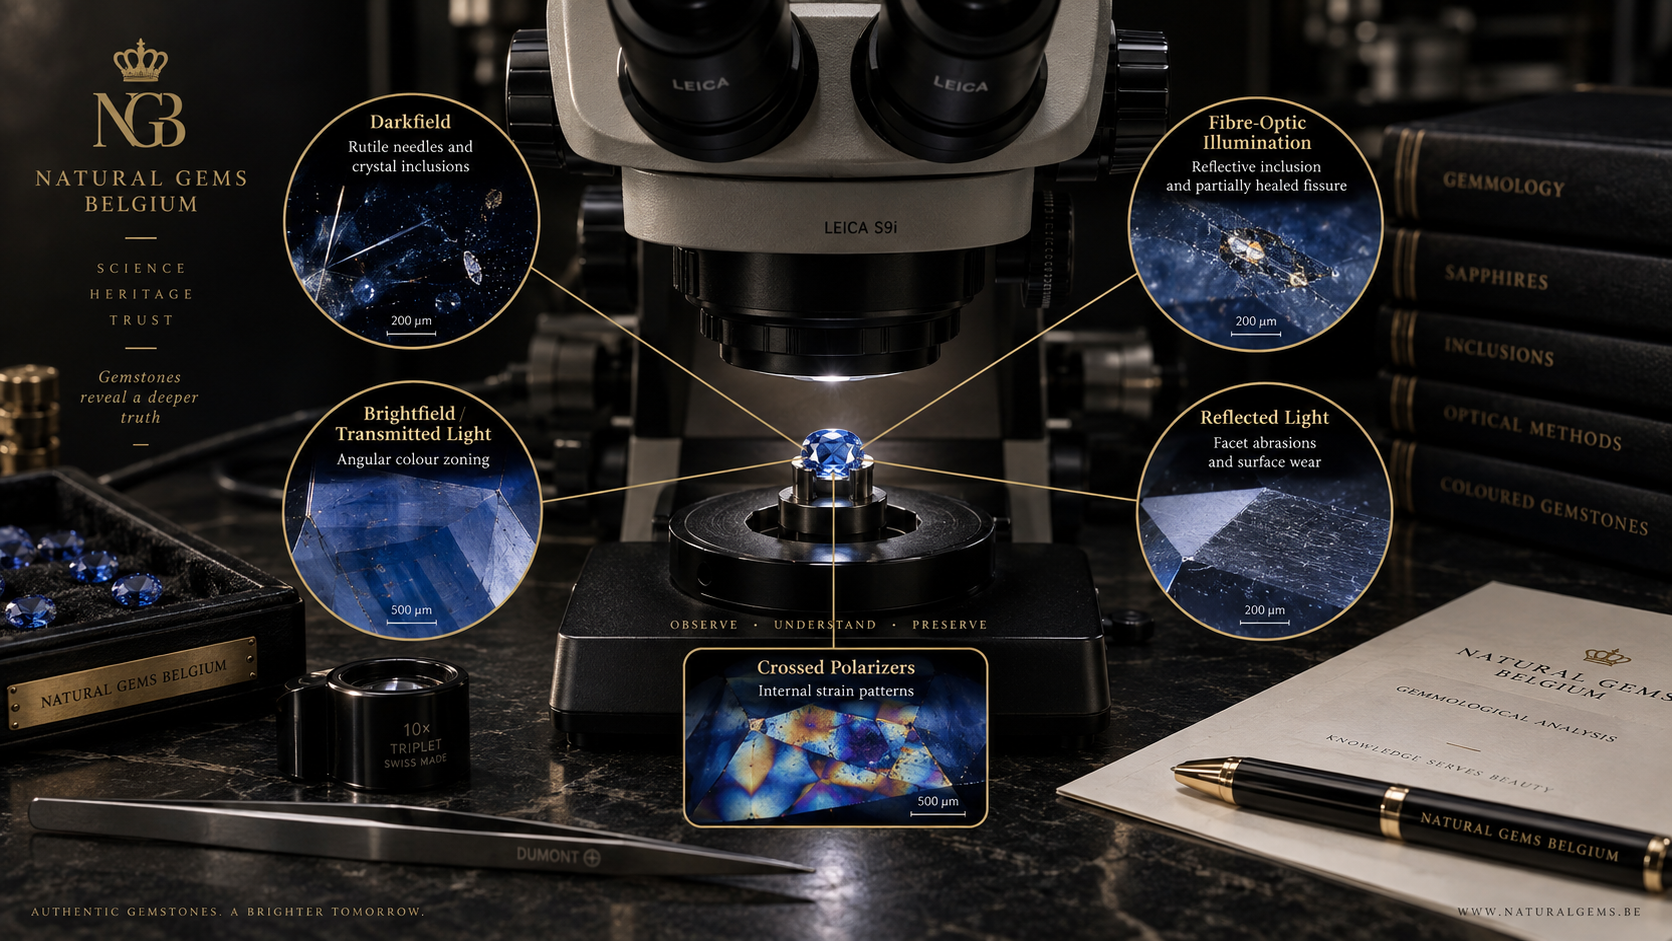
GIA laboratory gemmologists use several illumination techniques, including:
- darkfield;
- brightfield;
- diffused transmitted light;
- reflected light;
- polarized light;
- fibre-optic illumination.
Learning what each technique reveals is one of the foundations of practical gemmology.
This guide explains how to use those techniques systematically, how to move through a gemstone rather than merely looking at it, and how to separate microscopic observation from conclusions about identity, treatment and origin.
Table of Contents
1. What Is a Gemmological Microscope?
A gemmological microscope is normally a binocular stereomicroscope configured specifically for examining gemstones and jewellery.
Unlike many biological microscopes, it is designed to provide a three-dimensional view of relatively large solid objects rather than thin transparent slides.
A professional gem microscope commonly combines:
- stereoscopic optics;
- variable magnification;
- gemstone holder;
- darkfield well;
- transmitted illumination;
- overhead illumination;
- adjustable focus;
- optional polarization;
- fibre-optic lighting.
Modern professional systems may reach around 50× total magnification for routine gemological examination.
GIA laboratory gemmologists use microscopes at magnifications up to approximately this level when analysing coloured gemstones.
2. Why 50× Is Not Automatically Better Than 10×
Magnification is useful, but more magnification is not always more informative.
At lower magnification you gain:
- larger field of view;
- greater context;
- easier orientation;
- more depth.
At higher magnification you gain:
- finer detail;
- closer examination of small inclusions;
- better examination of treatment features.
The effective strategy is therefore:
start low → locate the feature → increase magnification gradually.
Beginning at maximum magnification can make you lose your position inside the gemstone.
You may see a fascinating structure without knowing where it sits in relation to the rest of the stone.
3. Microscopy Begins Before You Look Through the Eyepieces
Before placing a gemstone under the microscope:
- Clean the stone appropriately.
- Clean the microscope stage and stone holder.
- Check the eyepieces.
- Begin at low magnification.
- Select moderate illumination.
- Secure the gemstone.
Dust is a major source of confusion.
A fibre or dust particle resting on the gemstone can look remarkably dramatic under magnification.
Surface contamination should not be mistaken for an internal inclusion.
4. Secure the Gemstone
Loose gemstones should normally be held with an appropriate stone holder or tweezers designed for microscope use.
The stone should be secure but not crushed.
Pay particular attention to:
- thin girdles;
- marquise points;
- pear points;
- fragile cleavage directions;
- surface-reaching fractures.
Mounted gemstones require different positioning.
Never force jewellery against the microscope stage or holder simply to obtain a better view.
5. Start Through the Largest Window
For a faceted gemstone, the table is usually the most convenient starting point.
GIA microscopy guidance recommends beginning through the broadest available window and then examining the gemstone from pavilion and other directions.
The principle is simple:
start where you can see the most.
After finding the major internal structures, rotate and tilt the gemstone to examine them from other directions.
One orientation is never enough.
6. Establish the Surface First
Focus initially on:
- table;
- facet junction;
- scratch;
- dust particle.
Once the surface is clearly focused, move the focus progressively downward through the gemstone.
This gives you spatial orientation.
You can now distinguish approximately between:
- surface feature;
- shallow inclusion;
- deeper inclusion;
- pavilion-related reflection.
Without this discipline, it is easy to misjudge where a microscopic feature actually lies.
7. Learn to Focus Through Depth
A gemstone is three-dimensional.
At moderate or high magnification, only a relatively narrow depth range will appear sharply focused at one time.
Move the focal plane slowly through the stone.
Think:
top surface → upper interior → centre → lower interior → pavilion.
This is similar to examining successive slices.
If you find an important inclusion, focus above and below it.
This can help determine its:
- three-dimensional shape;
- relation to a fracture;
- relation to zoning;
- depth within the stone.
8. The Most Important Rule: Change the Lighting
A gemstone should almost never be considered completely examined after one illumination method.
GIA specifically recommends using several lighting environments because each can reveal information that another may hide.
This is one of the most important habits in microscopy:
When a feature is interesting, do not only increase magnification. Change the light.
The same inclusion can appear completely different under darkfield and fibre-optic illumination.
9. Darkfield Illumination
Darkfield is one of the classic gemmological microscope techniques.
The principle is ingenious.
The direct illumination is blocked from entering the microscope objective.
Instead, diffused light enters the gemstone primarily from around its sides.
The observer sees a dark background.
Internal features scatter or reflect some of the side illumination toward the microscope.
They therefore appear:
bright against dark.
10. Why Darkfield Is So Effective
A transparent gemstone can contain inclusions with relatively low contrast.
Against a bright background, those features may visually disappear.
Darkfield reverses the situation.
The background becomes dark while inclusions scatter light.
This can make:
- crystals;
- needles;
- fingerprints;
- fractures;
- particles;
- clouds
stand out dramatically.
GIA’s Gemolite instructions describe inclusions in darkfield as appearing bright against the dark background produced by the microscope baffle.
11. Setting Up Darkfield
Exact controls depend on the microscope design, but the basic configuration is:
- gemstone above the light well;
- darkfield baffle or shield closed;
- well illumination on;
- direct transmitted light blocked.
Light reaches the stone around the edge of the baffle.
The central background remains dark.
Begin with moderate brightness.
Too much light can reduce contrast and create distracting reflections.
12. What to Look for First in Darkfield
At low magnification, scan for:
- bright crystals;
- reflective fissures;
- fine needles;
- particle clouds;
- cavities;
- partially healed fractures.
Once you find a feature, rotate the stone.
Many inclusions scatter light directionally.
A feature can go from nearly invisible to intensely bright after only a few degrees of movement.
13. Darkfield and Crystal Inclusions
Mineral crystals are often excellent darkfield subjects.
A crystal may appear:
- bright;
- sharply outlined;
- reflective;
- apparently suspended.
Its relief against the host may become much clearer.
However, do not identify a crystal solely from its darkfield appearance.
Shape can narrow possibilities.
It rarely proves mineral identity.
Raman spectroscopy may be required when exact identification matters.
14. Darkfield and Rutile Silk
Fine rutile needles in corundum can become clearly visible under suitable darkfield conditions.
Look for:
- individual needles;
- parallel arrays;
- intersecting systems;
- dense silk clouds.
The apparent morphology can contribute information about:
- natural growth;
- exsolution;
- possible treatment modification.
But darkfield alone does not prove a sapphire is unheated.
Low-temperature treatment can preserve natural-looking inclusion scenes.
15. Darkfield and Fingerprints
Partially healed fissures may become beautifully visible under darkfield.
Small cavities along the healed fracture scatter light and produce:
- fingerprint patterns;
- feather-like structures;
- networks.
These structures can be scientifically informative.
But fingerprint-like inclusions occur across multiple gemstones.
Their presence alone does not prove:
- one species;
- one country;
- untreated status.
16. Darkfield Can Sometimes Hide Information
Darkfield is powerful precisely because it creates contrast.
But high contrast can conceal other details.
An opaque crystal may appear simply dark.
Fine internal structure may disappear.
Colour zoning can be difficult to interpret.
This is why darkfield should not become the default setting for everything.
A good microscope examination involves switching illumination deliberately.
17. Brightfield Illumination
Brightfield uses transmitted light passing through the gemstone toward the microscope.
The background therefore becomes:
bright.
Inclusions often appear:
- dark;
- silhouetted;
- differently coloured.
This is almost the visual inverse of darkfield.
GIA defines brightfield or transmitted illumination as a configuration where the specimen is positioned between the objective and the direct light source.
18. Darkfield Versus Brightfield
Imagine a small transparent crystal inclusion.
Under darkfield:
bright inclusion + dark background
Under brightfield:
darker inclusion + bright background
Neither image is inherently more correct.
They emphasise different optical characteristics.
Comparing both can reveal:
- shape;
- transparency;
- colour;
- internal detail.
This comparative approach is more informative than relying on either one independently.
19. Brightfield and Colour Zoning
One of brightfield’s most important gemmological uses is examining:
colour zoning.
Transmitted illumination passes through the stone and reveals variations in absorption.
You may observe:
- blue-to-colourless bands in sapphire;
- angular growth zones;
- straight bands;
- sector zoning;
- colour concentrations.
GIA specifically identifies transmitted/diffused illumination as useful for observing colour zoning.
20. Diffused Brightfield
Direct transmitted light can be too harsh.
It may create:
- hotspots;
- reflections;
- washed-out areas.
A diffuser placed between the illumination source and gemstone spreads the light more evenly.
This produces:
diffused transmitted illumination.
The result can be excellent for:
- subtle zoning;
- growth bands;
- colour distribution.
GIA notes that diffuser plates can reduce bright reflective areas and improve transmitted-light observation.
21. A Simple Colour-Zoning Exercise
Take a transparent sapphire.
- Begin in darkfield.
- Locate major inclusions.
- Switch to transmitted brightfield.
- Reduce brightness.
- Add diffusion if available.
- Slowly rotate the stone.
You may discover colour zoning that was almost invisible in darkfield.
This teaches a fundamental lesson:
lighting changes the evidence available to you.
22. Brightfield and Opaque Inclusions
Brightfield can silhouette opaque inclusions exceptionally well.
An opaque crystal may become:
- strongly defined;
- dark;
- geometrically clear.
But internal detail can be lost because little or no light passes through it.
Switching later to fibre-optic illumination may reveal surface relief or reflective characteristics that brightfield cannot show.
23. Fibre-Optic Illumination
Fibre-optic lighting is one of the most versatile tools in advanced gemstone microscopy.
Unlike well illumination, a fibre-optic guide creates a:
small directional light source.
You can place that light:
- above;
- below;
- beside;
- behind;
- at a shallow angle.
This allows you to target individual inclusions.
GIA describes fibre-optic illumination as particularly versatile because it can illuminate transparent through opaque gems from essentially any chosen angle.
24. Why Fibre-Optic Light Changes Everything
Many microscopic features reflect light only when the illumination arrives from a favourable direction.
A fracture can disappear under general illumination.
Move a pinpoint light by a few centimetres and it may flash brilliantly.
A crystal can suddenly reveal:
- relief;
- internal planes;
- thin-film interference;
- altered surface texture.
This directional control is why fibre-optic lighting is so valuable for treatment investigation.
25. How to Use Fibre-Optic Light
Begin with low intensity.
Place the light to the side of the stone.
Then sweep it slowly around the gemstone while watching through the microscope.
Do not move rapidly.
Observe how the feature changes when the illumination moves.
Try:
- low-angle side lighting;
- near-horizontal lighting;
- light from behind;
- opposite-side illumination.
You are effectively mapping how the microscopic structure interacts with light.
26. Fibre-Optic Lighting and Fractures
Fractures can act like tiny mirrors.
When fibre-optic light reaches them at the correct angle, they can produce powerful flashes.
This may help reveal:
- fracture extent;
- healed versus open areas;
- filler;
- thin films.
If a fissure disappears, do not assume it ended.
Change the light angle first.
27. Fibre-Optic Lighting and Thin-Film Interference
Some microscopic gaps are extremely thin.
Light reflecting from opposite boundaries can interfere.
This creates rainbow colours.
GIA has documented crystal inclusions whose appearance changed dramatically between darkfield and fibre-optic illumination: a crystal appearing suspended in darkfield produced vivid interference colours under directional fibre-optic lighting.
Such colour does not necessarily mean the inclusion itself is colourful.
The colour can be optical interference.
28. Fibre-Optic Lighting and Heat Treatment
Directional lighting can be highly useful when studying inclusions modified by heat.
Possible observations include:
- melted-looking crystals;
- altered rutile;
- discoid fractures;
- glassy residues;
- recrystallised surfaces.
GIA laboratory documentation demonstrates darkfield combined with fibre-optic illumination revealing residues associated with heat treatment in ruby.
Microscopic interpretation should still be combined with other evidence.
29. Fibre-Optic Lighting and Filled Fractures
Fracture filling can create features that become more obvious with directional light.
Depending on the gemstone and filler, you may observe:
- flash effects;
- bubbles;
- flow structures;
- colour differences;
- lustre differences.
The light should be swept through several angles.
A flash visible from only one narrow direction can be highly informative.
30. Reflected Light
Reflected illumination comes from above or beside the stone and reflects from its external surface toward the microscope.
It is particularly useful for examining:
- polish;
- scratches;
- chips;
- cavities;
- coatings;
- surface-reaching fractures;
- facet edges.
GIA uses reflected illumination specifically for external features.
31. Surface or Internal?
One of microscopy’s most important practical questions is whether a feature reaches the surface.
Suppose you find a fracture.
Under darkfield you can trace much of it.
Now switch to reflected light.
Focus on the external facet where the fracture appears to terminate.
You may observe:
- opening;
- polish interruption;
- surface line.
This can confirm that the fissure is surface-reaching.
That distinction can matter for:
- durability;
- clarity enhancement;
- valuation.
32. Reflected Light and Coatings
Surface coatings are often best investigated with reflected illumination.
Look at:
- facet junctions;
- scratches;
- worn edges;
- girdle;
- chips.
A coating can sometimes show:
- peeling;
- colour concentration;
- different surface lustre;
- exposed underlying material.
Do not assume every iridescent surface proves coating.
Polish and interference phenomena can also create optical effects.
33. Reflected Light and Glass Residue
Some treated gemstones may show glassy residue in:
- cavities;
- surface-reaching fissures.
Reflected light can highlight differences between the lustre of:
- host gemstone;
- foreign filler.
GIA laboratory examples demonstrate reflective illumination revealing glass residue in treated ruby.
34. Polarized Light
Polarized microscopy adds another layer of information.
A polarizing filter allows light vibrating primarily in one plane to pass.
A second polarizer, called the:
analyzer
is positioned above the stone.
When the two are oriented at 90 degrees, they are:
crossed polarizers.
Without a suitable sample between them, the view becomes dark.
A gemstone placed between the filters can modify the light.
35. What Crossed Polarizers Can Reveal
Crossed polarizers can make several features more visible, including:
- strain;
- birefringence-related patterns;
- optically oriented inclusions;
- twinning;
- growth structures.
GIA describes polarized light as useful for distinguishing optically aligned and unaligned features within gemstones.
36. Strain Patterns
Internal strain can alter how light passes through a gemstone.
Between crossed polarizers this may produce:
- bright regions;
- coloured interference;
- cross-like patterns;
- irregular strain fields.
Strain can be particularly important in:
- diamond;
- synthetic materials;
- gemstones surrounding inclusions.
But strain patterns must be interpreted carefully.
A visual pattern is not automatically diagnostic.
37. Polarization and Inclusion Orientation
Some inclusions are structurally related to the host crystal.
Examples can include:
- rutile needles;
- platelets;
- twin-related features.
Crossed polarizers can sometimes reveal relationships difficult to see in ordinary light.
This allows the gemmologist to study not only:
what is present
but also:
how it is oriented within the host.
38. One Inclusion, Five Views
A powerful training exercise is to select one obvious inclusion and examine it sequentially under:
- darkfield;
- brightfield;
- diffused brightfield;
- fibre-optic illumination;
- reflected light.
If useful, add polarized light.
Record what changes.
You may discover that what initially looked like a simple crystal actually has:
- an attached fracture;
- reflective faces;
- colourless interior;
- thin-film boundary.
This exercise teaches microscopy better than memorising definitions.
39. Rotate the Gemstone, Not Just the Light
Lighting alone is not enough.
The gemstone must also be:
- rotated;
- tilted;
- rocked.
A faceted gemstone is an optical system filled with reflective surfaces.
Facet reflections can both help and hinder observation.
Changing orientation can open entirely new optical windows into the stone.
40. Use the Pavilion
The table provides an obvious viewing window.
But pavilion facets can reveal features hidden under the table because of:
- reflection;
- depth;
- orientation.
GIA advises examining stones from multiple directions, including pavilion views.
A feature hidden behind a reflective facet from above may become obvious from below.
41. Beware of Internal Reflections
Faceted gemstones can create multiple reflected images of the same inclusion.
A single crystal may appear several times.
Before concluding that you see multiple inclusions:
- rotate the stone slightly;
- observe whether all images move together;
- change focus depth.
Reflections often behave differently from actual separate inclusions.
42. Depth Can Be Misleading
Microscopes create strong visual information, but depth perception inside a faceted stone can still be deceptive.
Refraction changes apparent position.
Reflective facets create virtual images.
A feature may appear closer or farther than expected.
Viewing from several directions is the best defence against misinterpretation.
43. Microscopy and Natural Origin
One major purpose of gemstone microscopy is distinguishing:
natural
from
laboratory-grown
materials.
Natural gemstones can contain:
- mineral inclusions;
- geological fractures;
- fluid inclusions;
- natural zoning;
- exsolution features.
Synthetic materials may contain features related to their growth processes.
These can include:
- curved growth;
- flux residue;
- metallic particles;
- characteristic growth sectors;
- bubbles.
But no simplistic universal rule exists.
44. Synthetic Features Can Look Natural
Modern synthetic gemstones can be extremely sophisticated.
An inclusion that appears natural under one lighting method may reveal its true character only when:
- rotated;
- illuminated differently;
- examined at higher magnification.
Advanced testing may still be required.
Therefore:
Microscopy can provide powerful natural-versus-synthetic evidence without always providing the final answer.
45. Microscopy and Heat Treatment
Heating can modify existing inclusions.
In corundum, possible microscopic features include:
- partially dissolved rutile;
- altered zircon;
- expanded fractures;
- recrystallised material;
- residue.
These may be strongly indicative of heat treatment.
But lower-temperature treatments can leave many inclusions nearly unchanged.
The absence of obvious heated features therefore does not prove:
unheated.
46. Microscopy and Geographic Origin
Inclusion scenes are essential in geographic-origin work for several gemstones.
For sapphire, laboratories examine combinations of:
- rutile;
- zircon;
- mica;
- fingerprints;
- colour zoning;
- particles;
- twinning.
But the microscope is only one part of professional origin determination.
Modern laboratories may also require:
- trace-element chemistry;
- UV-Vis-NIR spectroscopy;
- FTIR;
- reference collections.
A microscopic feature may be suggestive.
It should not be treated as a country label.
47. Microscopy and Emerald Clarity Enhancement
Emerald frequently contains fissures.
Some are filled with:
- oils;
- resins;
- other substances
to reduce their visual appearance.
Microscopy can help reveal:
- filler distribution;
- bubbles;
- flow structures;
- colour differences;
- flash effects.
Lighting angle can make a substantial difference.
Fibre-optic and reflected illumination are particularly useful tools.
Professional determination of enhancement level nevertheless requires expertise and standardised evaluation.
48. Microscopy and Dye
Dyed gem materials can show colour concentration in:
- cracks;
- pores;
- cavities;
- grain boundaries.
Under magnification these concentrations may look much stronger than the surrounding body colour.
Reflected and transmitted illumination can be useful for comparing:
- surface;
- interior.
Again, absence of visible dye lines does not automatically prove untreated colour.
49. Microscopy and Assembled Stones
Some jewellery materials are constructed from multiple components.
Examples include:
- doublets;
- triplets.
Microscopy can reveal:
- junction planes;
- glue;
- bubbles;
- different lustres;
- different refractive behaviour.
Examine the girdle from reflected and transmitted directions.
A joining plane can sometimes be far easier to see from the side than from the face-up position.
50. Microscopy and Damage
Not every microscopic observation is about identity.
The microscope is exceptionally useful for evaluating condition.
Look for:
- chips;
- bruising;
- facet-edge abrasion;
- cavities;
- girdle damage;
- surface-reaching fissures.
For jewellery, also inspect:
- prongs;
- metal wear;
- cracks;
- solder joins.
Microscopy can therefore help prevent damage before it becomes catastrophic.
51. Diamond Examination
Darkfield microscopy has historically been central to diamond clarity examination.
Inclusions stand out strongly against the dark background.
But professional diamond microscopy can also involve:
- reflected lighting;
- diffused lighting;
- polarization.
Some features require multiple views.
The lesson from coloured stones applies equally:
do not let one lighting method become automatic.
52. Colour Is Not Always Reliable Under Microscope Lighting
Microscope lighting is designed to reveal structure.
It is not automatically designed for accurate colour grading.
High-intensity or directional light can alter perceived colour.
Darkfield can make some coloured gemstones appear deeper or more saturated.
For formal colour evaluation, use appropriate standardised viewing conditions rather than relying on the microscopic appearance.
53. An Example: Blue Sapphire
A systematic blue-sapphire examination might proceed like this.
Darkfield
Look for:
- rutile;
- mineral crystals;
- healed fractures;
- particles.
Brightfield
Look for:
- colour zoning;
- growth structure.
Fibre-Optic
Investigate:
- zircon;
- altered inclusions;
- reflective fractures;
- heat-related residues.
Reflected Light
Examine:
- surface-reaching fissures;
- facet condition;
- coating.
Polarized Light
Look for:
- strain;
- twinning;
- oriented features.
No one lighting method answers every question.
54. An Example: Emerald
For emerald:
Darkfield
Search for:
- crystals;
- fluid inclusions;
- fissures.
Fibre-Optic
Examine:
- fissure filling;
- reflective surfaces;
- three-phase inclusions.
Reflected Light
Check:
- surface-reaching fractures;
- filler at openings;
- polish.
Brightfield
Observe:
- colour distribution;
- growth zoning.
The sequence can be adapted according to what the stone reveals.
55. An Example: Ruby
For ruby:
Darkfield
Look for:
- rutile silk;
- crystals;
- healed fissures.
Fibre-Optic
Investigate:
- altered silk;
- heated crystals;
- residues;
- glass-filled fissures.
Reflected Light
Examine:
- cavity filling;
- surface-reaching fractures.
Polarized Light
Study:
- twinning;
- strain.
The combination can provide powerful treatment and growth information.
56. Build a Visual Library
Professional microscopy is partly pattern recognition.
The more confirmed gemstones you examine, the stronger your internal reference becomes.
Study known examples of:
- natural sapphire;
- heated sapphire;
- flame-fusion corundum;
- flux-grown synthetic corundum;
- natural emerald;
- synthetic emerald;
- fracture-filled material.
Do not only memorise photographs.
Examine how features change under different lighting.
GIA describes repeated microscopic observation as a way of building a personal visual library of inclusions.
57. Take Notes Before Making Conclusions
Write down observations using neutral language.
For example:
Observation
“Numerous fine straight needles intersecting at consistent angles.”
rather than:
Premature conclusion
“Unheated natural sapphire.”
Or:
Observation
“Colourless angular crystal with discoid fracture.”
rather than:
“Zircon proves Sri Lankan origin.”
The neutral description remains valid even if your later interpretation changes.
58. Photomicrography
A camera attached to the microscope allows you to document:
- inclusions;
- treatments;
- growth structures;
- damage.
High-quality photomicrography requires control over:
- focus;
- lighting;
- exposure;
- depth of field;
- reflections.
Professional systems may use a dedicated trinocular camera port.
Modern GIA photomicroscopes integrate digital capture specifically for gemological documentation.
59. The Lighting Matters More Than the Camera
Beginners often assume better photography requires a more expensive camera.
In gemstone photomicrography, illumination often produces the greatest improvement.
A modest camera with excellent controlled lighting can reveal far more than an expensive camera with poor lighting.
Before changing cameras, improve:
- fibre-optic position;
- background;
- diffusion;
- reflection control.
The gemstone must be illuminated correctly before it can be photographed correctly.
60. Common Beginner Mistakes
Starting at Maximum Magnification
You lose context.
Start low and increase gradually.
Using Only Darkfield
Darkfield is powerful, not universal.
Using Too Much Light
Excess illumination destroys contrast.
Forgetting to Rotate the Stone
Many inclusions are directional.
Confusing Reflections with Inclusions
Check from several angles.
Naming Inclusions Immediately
Describe morphology first.
Ignoring the Surface
External evidence can be crucial.
Treating Microscopy as Proof of Geographic Origin
Origin requires multiple evidence types.
Assuming No Treatment Features Means Untreated
Some treatments leave subtle or ambiguous evidence.
61. A Professional Examination Sequence
Use this repeatable workflow.
Step 1 — Naked-Eye Observation
Record:
- colour;
- transparency;
- cut;
- obvious damage.
Step 2 — Low Magnification
Orient yourself.
Step 3 — Reflected Surface Examination
Inspect:
- polish;
- girdle;
- chips;
- openings.
Step 4 — Darkfield
Search for the overall inclusion scene.
Step 5 — Brightfield / Diffused Light
Look for:
- zoning;
- growth structure.
Step 6 — Fibre-Optic Light
Investigate individual features from multiple angles.
Step 7 — Polarized Light
Use when strain, twinning or optical orientation may be relevant.
Step 8 — Increase Magnification
Only after locating the feature.
Step 9 — Rotate and Tilt
View from table and pavilion directions.
Step 10 — Record
Separate observation from interpretation.
Step 11 — Escalate
Use additional gemmological testing when microscopy alone cannot answer the question.
62. What the Microscope Cannot Tell You Alone
Even a professional microscope cannot directly provide:
- exact refractive index;
- elemental concentrations;
- Raman identification;
- FTIR absorption spectrum;
- UV-Vis-NIR spectrum.
These may require:
- refractometer;
- spectroscope;
- Raman instrument;
- FTIR;
- LA-ICP-MS;
- other analytical methods.
Microscopy remains fundamental because it gives visual context to those measurements.
But modern laboratory gemmology is inherently:
multi-method.
63. Evidence Classification
| Statement | Classification |
|---|---|
| Professional gemological microscopes use multiple illumination techniques | Established gemmological practice |
| Darkfield makes many inclusions bright against a dark background | Established optical/gemmological principle |
| Brightfield/transmitted illumination is useful for colour zoning | Established gemmological practice |
| Fibre-optic lighting provides highly directional illumination | Established instrument principle |
| Reflected light is useful for surface features | Established gemmological practice |
| Crossed polarizers can reveal strain and optically oriented features | Established optical practice |
| Gemologists should examine a stone from several orientations | Established practical methodology |
| Microscopy can contribute to treatment detection | Established gemmological practice |
| Inclusion scenes can contribute to natural-versus-synthetic determination | Established gemmological practice |
| One microscope image automatically proves geographic origin | Incorrect |
| Lack of obvious heat features proves a gemstone is unheated | Incorrect |
| Darkfield is always the best illumination | Incorrect |
| Higher magnification always produces better conclusions | Incorrect |
64. The Most Important Microscopy Habit
The greatest mistake in microscope use is asking:
“What magnification should I use?”
before asking:
“What am I trying to reveal?”
If you want to see:
General inclusions
Start with:
darkfield
Colour zoning
Try:
brightfield / diffused transmitted light
Reflective fracture or inclusion
Try:
fibre-optic illumination
Surface polish or coating
Try:
reflected light
Strain or optical orientation
Try:
crossed polarizers
Magnification is only one control.
Lighting determines what information becomes visible.
Conclusion
The gemmological microscope is one of the most powerful instruments available to a practising gemmologist.
But its power does not come simply from magnification.
It comes from controlling light.
Darkfield can transform nearly invisible inclusions into bright structures suspended against black.
Brightfield can reveal zoning hidden by darkfield contrast.
Diffused transmitted light can expose subtle growth patterns.
Fibre-optic illumination allows individual fractures and crystals to be interrogated from multiple directions.
Reflected light moves the investigation from the gemstone’s interior to its surface.
Crossed polarizers reveal another world of strain and orientation.
The same gemstone can therefore tell several different stories depending on how it is illuminated.
This leads to the fundamental rule of gemmological microscopy:
Never assume that one view is the whole view.
Start at low magnification.
Establish the surface.
Focus through depth.
Rotate the gemstone.
Change the lighting.
Examine the same feature several ways.
Record what you see before deciding what it means.
And when microscopy cannot establish the answer, combine it with the appropriate additional test.
Professional gemmology does not rely on one dramatic inclusion.
It relies on converging evidence.
The microscope is extraordinarily valuable because it teaches you to gather that evidence carefully—one layer, one angle and one beam of light at a time.
References & Further Reading
McClure, S. F. et al. — “Analysis of Gemstones at GIA Laboratories.” Gems & Gemology, Winter 2024, Gemological Institute of America.
A particularly important modern reference describing GIA laboratory methodology. It documents routine microscope use to approximately 50× and explains darkfield, brightfield, diffused, reflected, polarized and fibre-optic illumination. It also provides treatment examples where darkfield, fibre-optic and reflected lighting reveal different evidence.
https://www.gia.edu/gems-gemology/winter-2024-gemstone-analysis
Gemological Institute of America — “How GIA Analyzes Colored Stones from Start to Finish.”
Accessible professional overview explaining why microscopy remains central despite advanced analytical instrumentation. It outlines the practical purposes of darkfield, diffused, reflected, fibre-optic and polarized illumination for treatment, inclusion, origin and synthetic detection.
https://www.gia.edu/gia-news-research/guide-how-gia-analyzes-colored-stones
Renfro, N. D. — “Digital Photomicrography for Gemologists.” Gems & Gemology, Summer 2015, Gemological Institute of America.
A major practical reference on gemstone microscopy and photomicrography. Particularly useful for comparing darkfield and brightfield illumination and understanding why transmitted light and diffusion can be especially effective for colour-zoned material.
https://www.gia.edu/gems-gemology/summer-2015-digital-photomicrography-gemologists
Gemological Institute of America — GIA Gemolite NXT Microscope User Guide.
Technical operating reference for modern professional gemmological microscopy. The guide explains practical darkfield configuration and the use of the microscope’s specialised illumination system.
https://www.gia.edu/doc/INST230005_Gemolite_Microscope_Guide.pdf
Gemological Institute of America — “GIA Gemolite NXT Microscope.”
Current technical reference for a professional gemmological microscope designed to support darkfield, brightfield, diffused, reflected and polarized illumination together with fibre-optic lighting.
https://store.gia.edu/products/gia-gemolite-nxt-microscope
Gemological Institute of America — “Insights From Inclusions.”
Practical guidance on building microscopic observation skills. GIA recommends viewing gemstone inclusions in several lighting environments and examining stones from multiple directions rather than relying on one static microscope view.
https://www.gia.edu/gem-inclusion-insight
Corvin, I. — “Suspended Crystal in Red Spinel.” Gems & Gemology, Winter 2023, Gemological Institute of America.
An excellent visual demonstration of why lighting technique matters: the same crystal inclusion appears suspended under darkfield yet shows striking thin-film interference colours under fibre-optic illumination.
https://www.gia.edu/gems-gemology/winter-2023-microworld-suspended-crystal-in-red-spinel
Henry, R. E., Linzmeyer, T. & Hernandez, J. — “Iridescent Tubes in Pezzottaite.” Gems & Gemology, Fall 2024, Gemological Institute of America.
Recent laboratory example illustrating how microscopic features can behave differently in darkfield and brightfield illumination and why illumination angle and background strongly influence what the observer sees.
https://www.gia.edu/gems-gemology/fall-2024-lab-notes-iridescent-tubes-in-pezzottaite
Gemological Institute of America — “Set of Polarizing Filters, Gemolite NXT.”
Technical reference explaining the use of plane-polarized and cross-polarized illumination to investigate optical properties that ordinary lighting cannot reveal.
https://store.gia.edu/products/nxt_polarizing_filter_set